Description
**Attention: At this time, I am recommending that my Mo’Flo! system NOT be used with Brock’s Exhaust Full Systems. Call for info. **
Mo’Flo!
ZX11 Carb Conversion Setup
Carbs, hardware, cables, battery tray, installed jetting…the whole shebang is available.
Call me for more info and pricing for your setup. 602-397-4869
Carb synch is necessary after install.
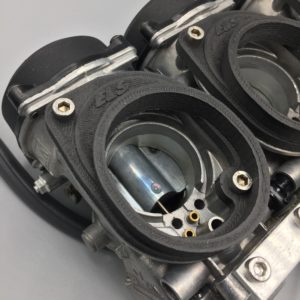
The Mo’Flo! Airbox is Here! Now parts are 3D Printed in Proto-Past HTPLA Heat Treated Filament. This Filament will withstand 310º F!!
This allows the adaptation of ZX11D FORTY mm carbs, the stockers are 36mm, onto any ZRX1100 or 1200 running a full aftermarket exhaust. (1100’s should be equipped with a minimum of ZX11 Cams). I have been working on this project for over two years and have created a really sanitary, “Factory Equipped” type setup. It really works great!
On a recent 2600 mile trip to South Fork Colorado via the North Rim of the Grand Canyon, I got between 45 and 52 mpg from my hot rodded 1109. The carburetion at elevations ranging from zero to 11,500 ft was faultless, except for a slightly lumpy idle at 11,500 ft.
This setup is an alternative to rattlely flat slides with their inherent marginal idle circuit and really poor gas mileage. (Some love the FCR’s ‘character’, and that’s Kool). The airbox sidecovers are cutout to fit and create an “invisible to the layman” mod.
Below are pictures and install tips. I will assume that you own a factory Shop Manual and have the necessary skills to handle the carb swap and will pay for all applicable carbon credits. If you have ANY questions, please call me at 602-397-4869

Mo’Flo!:
You’ll need the “Basic Package” from me PLUS the “Required Kawasaki Parts” (from me, or source yourself new or used) and a set of ZX11D Carbs (again, from me, or source yourself) to do the complete install.
Basic Package:
Mo’Flo! Airbox
Rear Intake Adapters, bored to fit 40mm carbs
FactoryPro Kustom Jet Kit w/2.5 Ring and K&N Airfilter and Uni Foam Filter
12 High Temp Cable Ties (4 extra)
Custom Float Level Gauge
6 Carb Boots (2 extra)
Airbox Plug
Trick Idle Cable Bracket
8 Intake Adapter Allen Bolts
Mo’Flo! Underseat Battery Tray
Total $590.00
Plus $50.00 Airbox Core Charge refundable within 30 days.
$640.00
————
Required Kawasaki Parts:
4)16065-1210 Intake Manifolds
4)92170-1160 Intake clamps
3)92068-006 Nipples
1)54012-1504 ZX11 Throttle cable
1)54012-1505 ZX11 Throttle cable
1)54017-1088 ZX11 Choke cable
1)92191-1124 Airbox Drain Hose
Pricing for above can be searched on this site 🙂
_______________
Options:
As Available-ZX11 Carb Set, Cleaned & Jet Kit Installed at Baseline Settings
Syncronization will be needed after install.
I can sell you any combination of parts you need, please call for a quote.
Replacement parts:
Set of six carb to airbox boots
High-Temp cable ties
Fuel rail O-rings
Set of four 92055-1426 Kawasaki float bowl oring/gaskets
Carb fuel rail O-rings…Not available from Kawasaki….. The carbs are pretty easy to un-rack and re-rack, then you’ll need to synchronize them. I recommend replacing them, I’ve even seen 1999 carbs with cracked o-rings. BE SURE to specify C or D model when ordering, they are different.
Allen bolts to replace the stripped Phillips head screws when you re-rack the carbs $6.00/set of eight, specify C or D model
It takes about ten days for me to assemble the MoFlo! setup. I also have carb sets. Carb sets will be rebuilt to order.
Mo’Flo! Install Tips:
Remove the stock carbs, throttle & choke cables, ignition coils (not necessary, but it makes the job easier…just tuck them up front), intake manifolds & clamps and airbox. To remove the airbox disconnect the two hoses on the drivers’ side lower, push the box rearward and tip the top forward past the frame rail. It then slides easily out the passenger side.
Install the new Mo’Flo! airbox now, while your memory is fresh, the same way it came out….front down towards the ground, bottom in the frame first then rotate it upward.
The ZX11D intake manifolds need to be installed upside down, that is why I recommend the STOCK rubber nipples. They can be removed and reinstalled easily with a long pair of needle nose pliers when you need to synchronize the carburetors. The number two manifold is where you’ll run a vacuum line to the petcock.
Trim the two locating tangs off the ZX11D intake clamp with a Dremel or the like so it is free to rotate any which way.
Install the clamps on the manifolds with the screws facing outwards, 1 & 2 to the drivers’ side, 3 & 4 to the passengers’ side, and mount so the screws are at the top as in the picture.
Mount the Carbon Fiber spacers to the rear of the carbs with included 5 x 14mm Allen head bolts and my Laser-Cut polyurethane gaskets. Pay attention, there are two cutouts on each to line up the the carb flanges. Use silicone or SuperGlue on the treads as a locking agent….DO NOT USE LOCTITE as it will attack the plastic and crack the spacers. Tighten to around 45 INCH/pounds with a good torque wrench…you do not want these to fall out, so pay attention. The intake boots will come pre-attached with high-temp cable ties. (picture shows Phillips head screws, they will be Allens in the kit)
Attach the ZX11D throttle cables to the carbs at this time. Be sure you have the cables in the correct positions, pull-push, and swing them out to the side.
Attach the fuel line you’ll be using to the junction of the carbs, or however you decide to set it up. The ZX11D carbs have dual fuel inlets as in the picture. ZX11C carbs have a single inlet between 2 & 3…C and D carbs jet EXACTLY the same.
ZZR1200 Carbs will also fit with my setup, the jetting is the same as ZX11c and D.
Use masking tape on each side of the airbox to the frame to hold it rearward…or have a helper hold it for you. Slide the carbs in from the clutch side paying attention to the boot/airbox interference. Insert carbs into intake manifolds. Use a 90 degree pick to hold the intake clamps upright and tighten the screws.
Stick your arm inside the airbox and work the boots onto the aluminum ovals. Once you get them started a bit, release the tape and insert the airbox bolts from the top and leave loose. Work all the boots into place, paying attention to the lower portions. You can move the box around to help. It’s really pretty easy, no real force required.
Fold the cable ties in half about 2 inches from the end and crimp lightly with needlenose pliers. Slide down between 2-3 and work end up between 1-2. Attach ends and leave loose for now. Repeat on other carbs.
OR
Loop the ties as shown, tape them to the carb tops and insert when installing the carbs. Untape and put into position…it’ll save a lot of effort.
Line up the ties on approx the center of the airbox rings paying attention to the lower areas. You can use a long thin screwdriver to locate the ties. Pull tight…one of those handy cable tie tools from Home Depot works great. Cut ends manually though, the tools have to be turned 90 degrees to cut, and that’s hard to do in the confines involved.
Attach hoses to the airbox. Install/route throttle & choke cables, reinstall coils if removed, attach fuel and pet cock hoses, etc. The airbox covers can be shaped with a Dremel and a coarse sanding drum to fit around the Mo’Flo!’s larger intake boots.
This system is designed to complement the ZX11D ECU. If you are going to use the stock ZRX ECU, you’ll need to disconnect the K-Tric connector and leave it off. On the ZRXOA.com board, Sean S has a comparison of advance curves with the K-Tric unplugged. Your bike will run better down low with the ZX11D ECU, see the ‘Update’ at the top line of this page.
Install the Carbon Fiber K&N filter mounting ring in the rear of the airbox. If you got the rear of the airbox from me, it will have been relieved so that it’s a removable snug fit….if you are overseas and I only shipped you the front, use a sanding drum & drill to go around the airbox opening a few times…clean ALL plastic shavings from airbox and reassemble. If it’s too loose, apply a light layer of silicone around the edge and insert. It should be removable for later remove/installs, so do not glue it really tight in there.
Install the K&N filter and then install the Uni Foam filter over the K&N one, the two work excellent with CV carbs.
Double check all your work.
Important:
BEFORE you get started on your carbs, get a floatbowl off and a carb slide in your hand and call me!
602-397-4869
Many of these ZX11 carbs have already had a jet kit installed and sometimes they have holes drilled in odd places that need to be plugged/filled w/epoxy, etc. IF you miss one, your bike will run like poop. PLEASE call me.
I’ve gone thru many, many sets, most had something that needed putting back to stock.
ZX11D Carb Cleaning, Float adjustment and Jetting http://www.VenturiCity.com
ZX11D carbs quite often already have some sort of jet kit installed. If yours do not have 2-158 and 2-160 mains, you need to inspect the upper air bleed for evidence of a reducer. The carb on the left does NOT have one, the carb on right DOES. Look at the pics closely (clik to enlarge). It’s directly to the right of the needle in each pic.
Sometimes these are driven in very deeply. Basically, the inside wall should be one diameter all the way to the little hole in the base. If there is a step in the wall, there is an orfice that needs to be removed.
To remove, take a drill bit slightly larger than the hole, and drill into it. It will grab and start rotating, then pull up.
This needs to be removed before the carbs can be jetted properly.
Air Bleed Reducers removed, there are 4 per carb set in DynoJet or Vance & Hines jetted carbs:
Sometimes tuners had really odd ideas on how to jet carbs.
Plastic slide carbs had one hole in the bottom of the slide. Metal slide carbs had two, one was drilled in at a 45 degree angle from the front. If you find three or more, you’ll need JB Weld to fix the extras.
To the immediate right is the oddest drilling I’ve seen so far, but a dental pick and JB Weld and She’s like new.
To the far right is a properly drilled metal slide.
When installing the rubber diaphrams, I’ve found a really neat trick. Wash them with SimpleGreen and warm water. Dry, and apply a very light layer of rubber cement…the kind you used in school. Keep it away from the brass orfice. Let dry for a minute and install the slide and gently press the diaphram into place.
The diaphrams get larger or smaller with age and the type gas used locally. The rubber cement ensures the rim will stay in place until you put the cover on. It rolls off easily with your finger if you need to reinstall them at a later date.
The slide to the right had three holes, one had already been JB Welded years before and is holding excellently.
WARNING: ELS Products MAY CONTAIN, or be Made With, Patented Parts, Tools, Components and/or Apparati. Manufacturing Facility DOES Contain Nuts.